01/10⏱ 1 min
1. Sign up & log in
You'll need an account to start. Sign up with Google in one tap, or with email.
1) Open the start page
Click 'Start for free' on the landing page, or go to getonecut.com/login directly.
2) Choose Google or email
Continue with Google (1 sec) or sign up with email/password. Google is faster — no password to remember — and we recommend it.
3) Verify (email signup)
If you signed up with email, click the verification link in your inbox to activate. (Google is instant.)
💡 Already have an account? Switch to the 'Log in' tab.
02/10⏱ 3–5 min
2. Connect platforms & multiple accounts
Connect the platforms you'll post to via OAuth. Your passwords are never stored. You can also connect multiple accounts on the same platform.
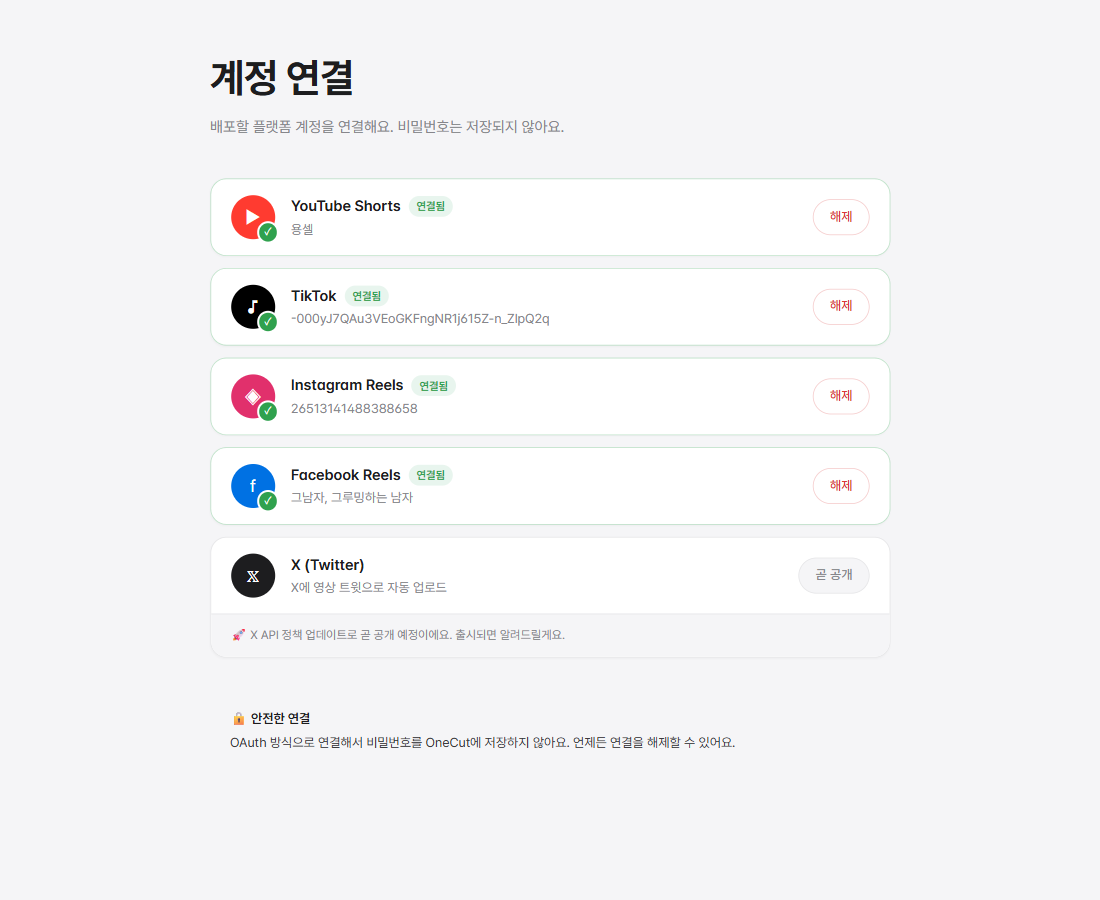
1) Dashboard → 'Connect accounts'
In the left sidebar, 'Connect accounts' lets you link 6 platforms: YouTube · Instagram · TikTok · Threads · X · Facebook.
🔴 YouTube · ◈ Instagram
YouTube: 'Connect' → Google login → pick channel → approve. (If you see "Google hasn't verified this app", click Advanced → Continue — that's expected.) Instagram requires a Business/Creator account (switch in the app if personal).
♪ TikTok · @ Threads
TikTok: log in → approve (done when @username shows). Inbox mode for now — auto-posting is in review. Threads: 'Connect' → log in → approve.
𝕏 X · f Facebook
X (Twitter): 'Connect' → log in → approve. Facebook needs a Page (not a personal profile). Your handle appears on the card once linked.
5) Multiple accounts on one platform
Add sub-accounts or brand accounts on the same platform. At deploy time you choose which account to post from, and switch between them at a glance.
💡 Connected accounts show as handles (e.g., @your_handle). Posting follows your account's own permissions.
03/10⏱ 5–10 min
3. AI Content Assistant — long video → shorts
Upload one long video and AI finds the highlights, cutting them into several vertical shorts automatically. You only pay for what you use (first 3 free).
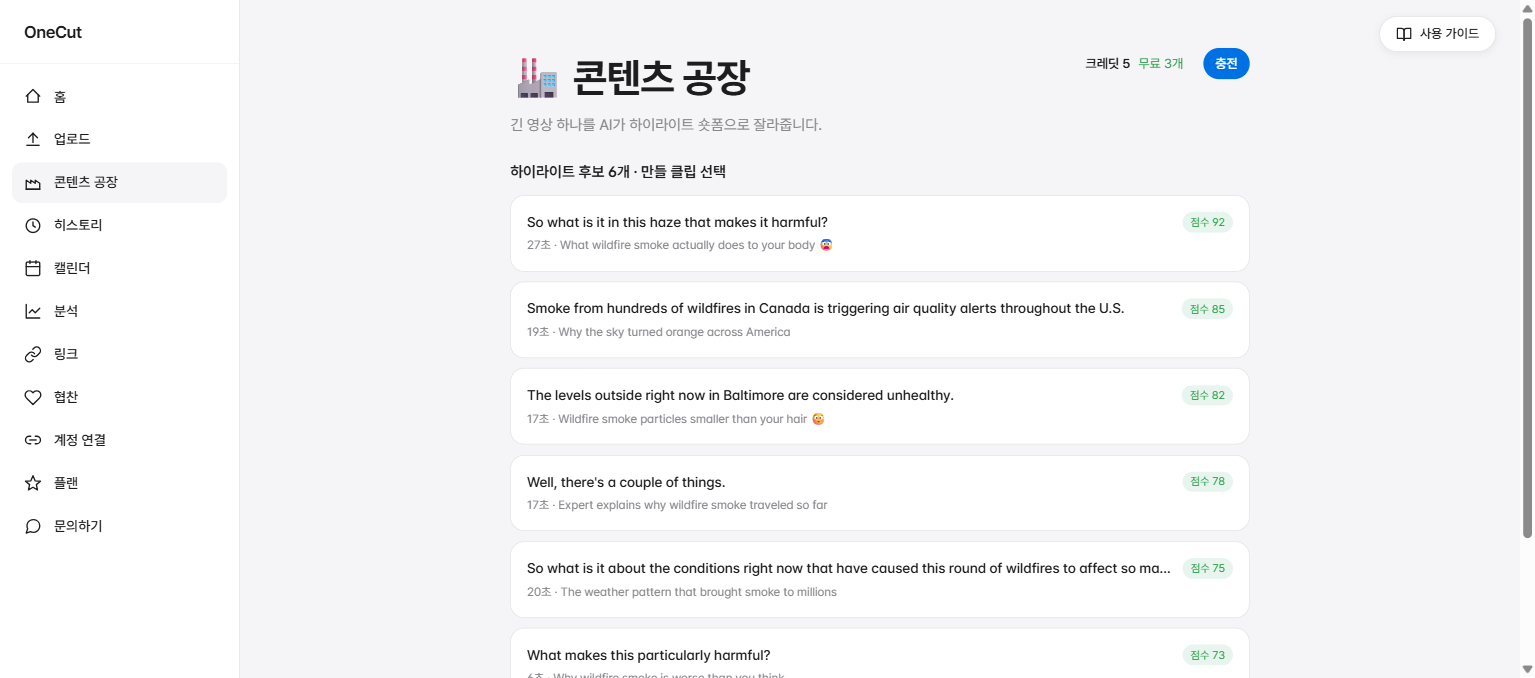
1) Upload a long video to the AI Content Assistant
In the sidebar 'AI Content Assistant', upload a podcast, vlog, lecture — any long video. MP4 and MOV supported.
2) AI analysis (captions + highlights)
AI transcribes the audio (STT) and auto-picks the highlight moments most likely to perform. This usually takes 1–3 minutes.
3) Pick your shorts
Candidates appear with a score. Choose the clips you want. The first 3 are free, then each short costs 1 credit.
4) Auto-render (vertical + captions)
Selected moments are rendered as 9:16 vertical shorts with burned-in captions. Preview them on the review screen when ready.
5) Review, then post or schedule
Post the clips you like to your connected platforms, or schedule them. (See step 5 for posting and scheduling.)
Auto Content Engine (optional)
Connect your YouTube channel and OneCut will automatically turn every new video into shorts. Choose semi-automatic (approve before posting) or fully automatic.
💡 Top up credits as 20 for $9 or 60 for $19 — purchased credits never expire.
04/10⏱ 2–3 min
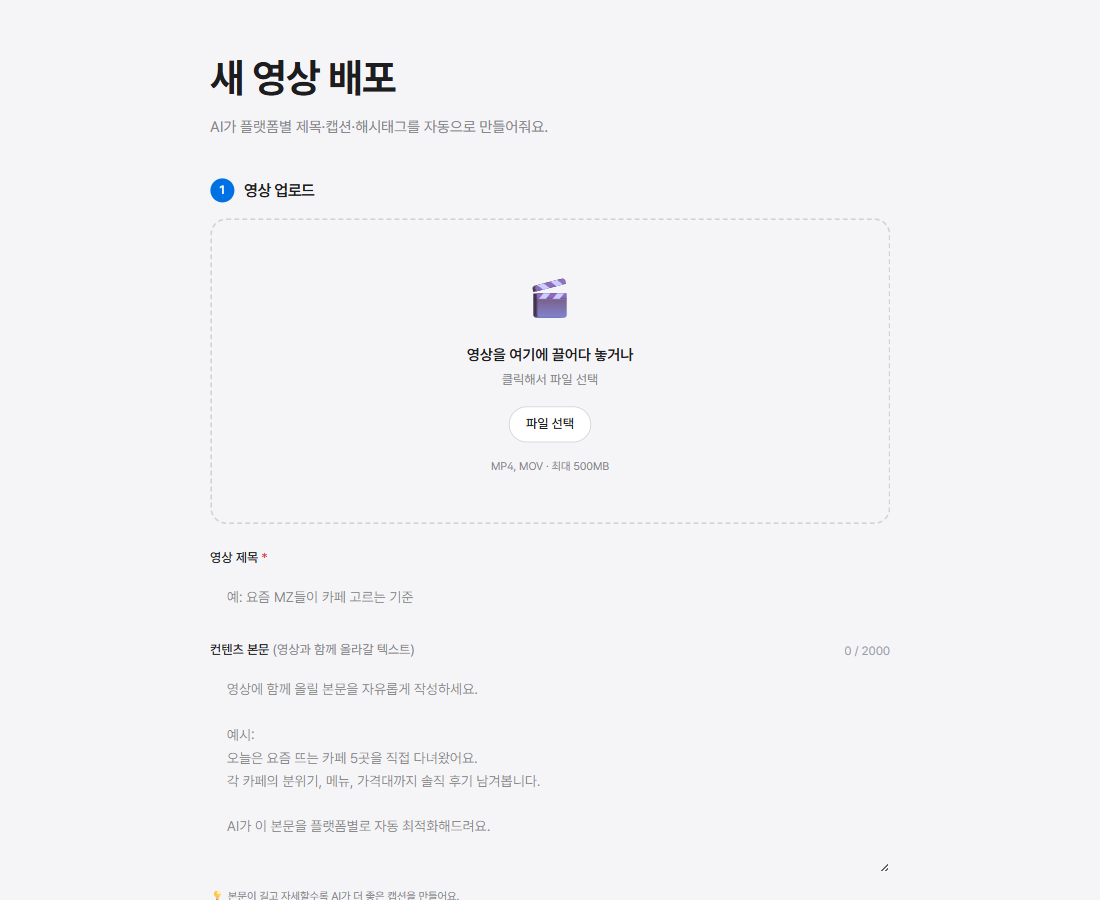
4. Direct upload & AI captions
Already have a short or clip ready? Upload it directly. AI writes platform-optimized titles, captions, and hashtags.
1) Choose a video file
Drag and drop in 'Upload'. MP4/MOV, up to 500MB. Vertical 9:16 recommended (best for Shorts/Reels/TikTok).
2) Enter a title
Write a one-line title. AI uses it as the basis for each platform's caption.
3) Add a description (optional, recommended)
3–5 sentences about the video make AI captions much better. The more detail, the better the result.
4) Common hashtags (optional)
Hashtags you enter here are added in front of the AI-generated ones on every platform (e.g., #daily, #vlog).
5) ✨ Generate AI captions
In 10–30 seconds you get per-platform captions — SEO for YouTube, hooks for TikTok, mood for Instagram, and so on.
6) Review & edit per platform
Check and freely edit the title/caption/hashtags in each platform tab. A preview card shows how it'll look.
💡 Don't like a caption? Use '🔄 Regenerate' or '✏️ Write your own'.
05/10⏱ 30 sec–1 min
5. Deploy & smart scheduling
Pick which platforms to post to, then publish now or schedule for the best time. Manage everything on a calendar.
1) Select platforms
Connected platforms are pre-selected. Uncheck to post to only some. With multiple accounts, also pick which account to post from.
2) Publish now or 🕐 schedule
Default is 'Publish now'. Choose 'Schedule' to auto-post later. Pick fast with the recommended best-time chips per platform.
3) Manage on the calendar
In 'Calendar', see scheduled posts by month and change the time or cancel with a click.
4) 🚀 Deploy
OneCut uploads the video and a background worker (Inngest) posts to each platform in parallel. You can close the browser.
5) Real-time status
Watch each platform live in the deploy monitor:
• ⏳ Uploading
• ✅ Done
• ❌ Failed (retry available)
6) TikTok inbox (in review)
TikTok is in inbox mode, so it won't auto-publish. Open the TikTok app inbox and tap 'Post' once more to publish. (Auto once Direct Post passes review.)
💡 Schedules can be set from at least 5 minutes out.
06/10⏱ 1 min
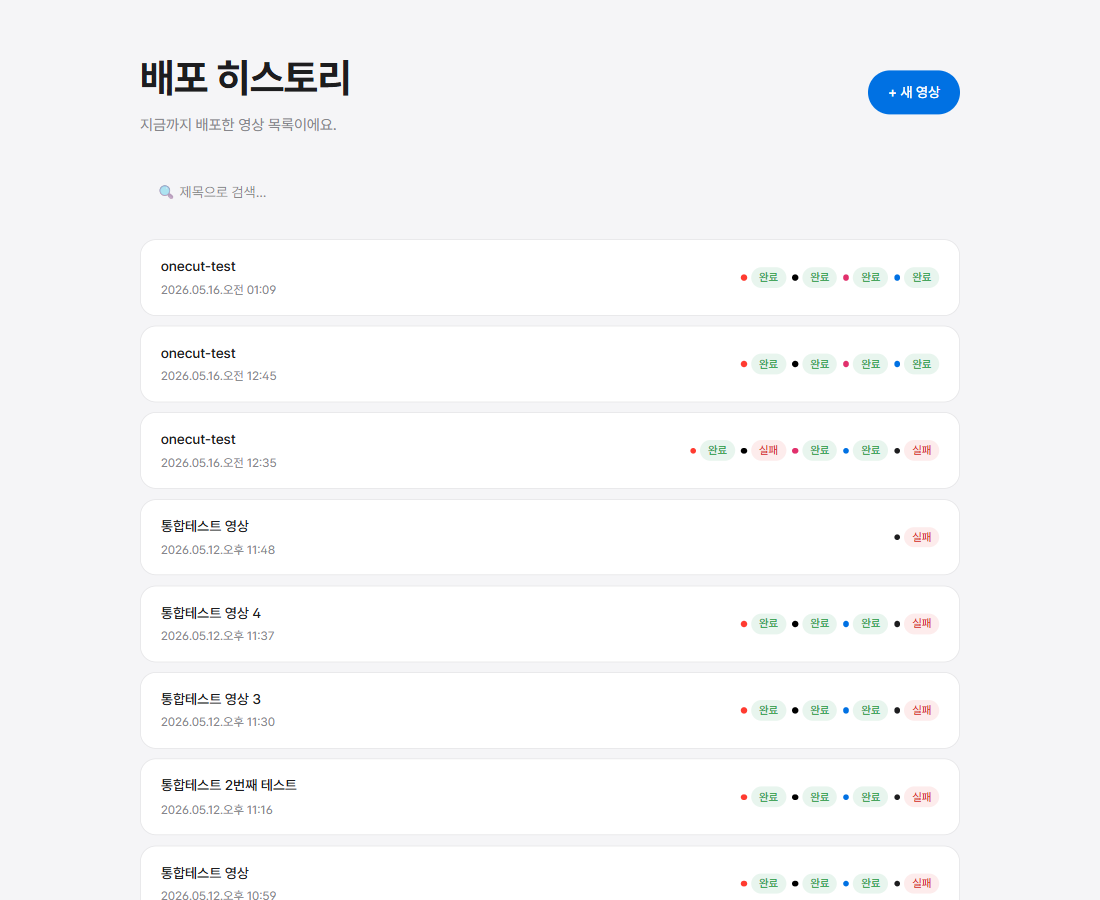
6. History & retry
See every video you've posted in one place, and retry any platform that failed.
1) 'History' menu
In the sidebar 'History', posts are listed by time, with a colored dot per platform status.
2) Click a video → details
Open a video to see per-platform status, posted URLs, and the AI-made captions/hashtags.
3) Retry a failed platform
Failed platforms show a '🔄 Retry' button to post again. (Expired tokens refresh automatically.)
4) View the posted video
Successful posts link out via 'View ↗'. YouTube · X · Facebook are direct links; Instagram · TikTok open in the app.
07/10⏱ 1 min
7. Analytics
Views, reach, and engagement for your posts at a glance. Auto-refreshes every 6 hours.
1) 'Analytics' menu
Sidebar 'Analytics'. Four stat cards: total views, likes, comments, reach.
2) Trend graph
Daily view totals over the last 30 days, so you can see which days landed.
3) Platform comparison
See whether YouTube, Instagram, or Facebook performs best, compared with colored bars.
4) Top 10 videos
Sorted by views. Click a video for per-platform detail (reach, saves, shares, etc.).
5) 🔄 Refresh
Pull the latest data manually. Auto-sync runs every 6 hours; first stats appear 1–24 hours after posting.
💡 TikTok analytics aren't available via their API, so only YouTube · Instagram · Facebook are shown.
08/10⏱ 2–3 min
8. Link-in-bio & sponsorship reports
Gather all your channels and links under one profile link, track clicks and conversions, and build sponsorship reports.
1) Set up 'Link-in-bio'
In the top menu 'Profile link setup', set your handle and profile (name, bio, photo). You get a getonecut.com/@handle address.
2) Add links
Add channels, latest videos, product links, and order them. Put this one address in your Instagram/TikTok bio.
3) Track clicks & conversions
Clicks and conversions for each link are counted automatically, so you can see what actually drives action.
4) Sponsorship reports
Under 'Sponsors', build a report combining video performance + clicks + conversions to share with brands — great for pitches and payouts.
💡 The profile link is available even on the free plan.
09/10⏱ 3 min
9. Auto Media Kit — a profile for brands
Build a media kit that's always up to date with live stats from your connected platforms, then send brands a single link. Perfect for receiving sponsorship inquiries or pitching one yourself.
Open Media Kit
Open 'Media Kit' from the dashboard's top menu. (If you don't have a profile link handle yet, create one on the Links page first.)
Fill in your info
Add a short bio, category, location, and a contact for collaboration inquiries, then choose which platforms to show on your media kit.
Pull in your followers
Tap 'Refresh followers' to pull numbers automatically from your connected accounts. For platforms that can't sync automatically, just enter them manually.
Publish it
Choose which sections and theme to show, turn on 'Public,' and save.
Share with brands
Send brands getonecut.com/k/yourhandle and you're done. Your stats stay automatically up to date.
💡 You can create one on the free plan too. Upgrade to Pro to remove the 'Made with OneCut' badge at the bottom.
10/10⏱ 1 min
10. Sponsorship Disclosure Automation — stay compliant
For sponsored or ad posts, OneCut automatically inserts the legally required disclosure wording — matched to Korea's FTC, the US FTC, and Japan's standards — into your caption and title in the language you're posting in.
Turn on the sponsorship toggle
On the upload screen, turn on 'Includes sponsorship/ad.'
Choose the type
Pick from Paid ad, Product sponsorship (free product), or Affiliate. The exact wording required for that type gets inserted.
Brand name & preview
Add a brand name (optional) for more specific wording. Preview exactly how it will appear on the first line of your post.
Deploy
When you deploy, the disclosure is automatically inserted in the right spot — the first line of the caption, the title, and the first hashtag.
⚠️ On-screen captions inside the video can't be added automatically. Video platforms like YouTube, TikTok, and Reels require an on-screen "Ad" label too under their rules, so please add that to the video yourself.
Need more help?